
A friend, who had a boat load of stuff to get rid of, was getting ready to have a yard sale and asked if I wanted anything before the sale. I immediately saw her console table and wondered what the heck had she been doing to it! It had been a hand-me-down through her family, seen it's fair share of bumps and dings and she was done with it! She didn't think anyone would want it because it was in such bad shape so she was going to put on the curb as trash! Can you believe?? Naturally, in my head I was doing the happy dance but I said very, very, very enthusiastically .... Ummm...I'll take it!
Ohhh yeah...I'm going to rock this freebie :)

I started with a good sanding. Not even joking...A GOOD SANDING! I didn't want to ask what the black gloopy, hard thing was so I sanded the heck out of it! And wouldn't you know it, because I'm working on multiple projects at the same time, I forgot to take pictures of the sanding and priming (as always, I prime with Zinsser Stain Blocking Primer).
Oh well...on to the good stuff :)
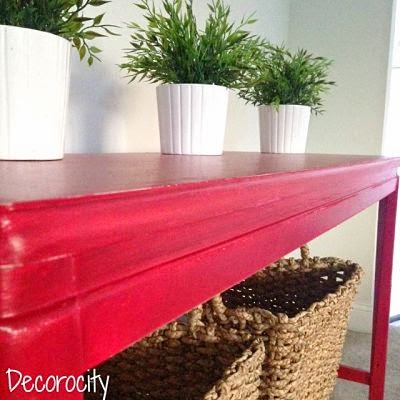
I knew that I wanted this console table to be a distressed red table. The number of red paint colors is C.R.A.Z.Y! It's quite overwhelming, so after looking at the upteen number of different red paint swatches and scouring the blogs, I came across this post showing different reds on different projects. It helped me narrow my choices and went with Behr Ruby Ring.

I knew going into this project I would need at least 3 coats.
 |
| 1st coat |
 |
| 2nd coat |
 |
| 3rd coat |
I really like the depth of the color of this red. I wanted a distressed look so I was going to add a glaze once I finished painting but I like the way it looks now. It turned out exactly as I imagined.
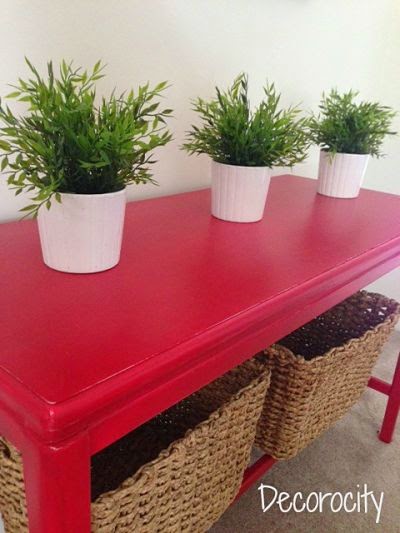
I lightly sanded the areas the paint would normally have been worn down.
I have been waiting for the right table to go underneath the art on the wall. When the sun fills the room, the red looks bright. But at night, the red looks close to the lighter red in the paintings. I think eventually I will put a dark glaze on it to warm it up.
 |
| The thermostats in this house are in the wrong spots :( |
Linked up:

What an awesome piece! You really made it shine with that red paint! Love it! I hope you'll be sharing this one at my Creative Ways Link Party! Have a great week.
ReplyDeleteBlessings,
Nici
Thank you Nici! It sure is a statement piece....hubby asked if I was sure I wanted it be red lol. Yep I'm sure! I am heading over to share it at your party :)
DeleteThank you for visiting!
It's red, it's beautiful - I love it - what a fabulous save!
ReplyDeleteThank you Julia! I appreciate your kind comments :)
DeleteLove the red and so smart to use the baskets underneath it too!
ReplyDelete- Lora
Thank you Lora! Have a great weekend :)
DeleteWhat a great job you've done and what a wonderful color!!
ReplyDeleteThank you Winnie!
DeleteOh wow, this looks amazing :) great job here...
ReplyDeleteThanks for linking up #Weekendbloghop
Thank you! I enjoyed looking at the projects and ideas at your blog hop!
Delete