The Ultimate Caramel Hot Chocolate

Everyone who knows me knows I'm a choco-holic!  I have been known to scoop chocolate frosting on a spoon and lick it like a lollipop!  A scoop of peanut butter and a scoop of chocolate on the same spoon...must try it!  Just sayin :)

Anyhoo....my girlfriend sent me a Caramel Hot Chocolate recipe that is soooo good!  It's rich and delicious but you seriously can't drink a huge mug because it will cause a sugar coma!  As the weather gets colder, we need to drink something warm and delicious.  Please give it a try.  You will not be disappointed!


Ultimate Caramel Hot Chocolate

Ingredients
  • 1/4 tsp fresh lemon juice
  • 1 1/2 cups granulated sugar
  • 4 1/2 cups room temperature milk (I used skim but any percentage should be fine)
  • 2 oz dark chocolate, finely chopped
  • 8 oz milk chocolate, finely chopped
  • Salt to taste (I used a big pinch)
  • Whipped cream
  • Caramel sauce
Instructions
  • In a small bowl, combine the lemon juice and sugar until the sugar is fragrant and damp
  • Place a medium saucepan over medium heat to preheat for a few minutes.  Once pan is hot, add the sugar.  Stir immediately and continuously.  Soon after it liquefies, it will take on a darker color.  Cook, stirring continuously, until it turns an amber color, thus making caramel.
  • Stream in the milk while continuing to stir.  The caramel may seize and form small chunks of sugar, but continue to stir the mixture.  When the milk is hot, the caramel will have melted and will be a smooth liquid.
  • Bring liquid to a simmer (small bubbles forming along sides of pan) remove pan from heat.  Do not let the liquid come to a boil.  Add the chopped chocolates to the pan and whisk until mixture is smooth and chocolate is melted.  Add salt to taste.
  • Serve with whipped cream and caramel sauce!  ENJOY!


In a small bowl, combine the lemon juice and sugar


Combine until sugar is fragrant and damp


Chop dark and milk chocolate


Add the chopped chocolates to the pan and whisk until mixture is smooth and chocolate is melted


Serve with whipped cream and caramel sauce!


Enjoy and stay warm :)


Linked up:
[Sweet Bella Roos] [Posed Perfection]

Vintage Desk Restoration

My middle son has been needing a desk for his room.  I had been looking for quite some time and because his room is small, it needed to be a small one.  Although, this may be a problem since he is 6 feet tall now!

I found one a few weeks ago at the thrift store and when I saw the price, it was done! It wasn't in the best shape and it had that old, basement smell but I knew I could give this oldie but goodie new life. For $6.99, how could I not?


A few things about my awesome comedian (middle son):  he is stylish, loves bold color, knows the best card tricks (even adults get freaked out how good he is), enjoys decorating AND keeps his room clean and neat all of the time without a word from me!  I know what your thinking...but really, I'm telling the truth!  I knew I could be daring with the color for his desk, so I decided on Benjamin Moore Orange Burst!


I sanded, filled in the dings and blemishes with wood putty, then lightly sanded before priming with my fav primer:


I had Home Depot color match a quart of the Benjamin Moore Orange Burst.  
Notice I use foil to cover my paint tray so I do have to buy a new tray for each project!

At one point while painting, I thought I smelled oranges.  True story!


It really is a beautiful color.  BUT....I needed 4 coats! Patience is not one of  my strongest attributes so I ended up working on multiple projects at the same time (many posts to come). Then finished up with 2 coats of Poly, sanding in between.


I painted the accent molding orange as well.

Even though the desk is working for him for now, I will have to keep an eye out for something larger because it's just too small for him.   I tried :)

Console Table Restoration - Ruby Ring Red

A friend, who had a boat load of stuff to get rid of, was getting ready to have a yard sale and asked if I wanted anything before the sale.  I immediately saw her console table and wondered what the heck had she been doing to it!  It had been a hand-me-down through her family, seen it's fair share of bumps and dings and she was done with it! She didn't think anyone would want it because it was in such bad shape so she was going to put on the curb as trash!  Can you believe??  Naturally, in my head I was doing the happy dance but I said very, very, very enthusiastically .... Ummm...I'll take it!  

Ohhh yeah...I'm going to rock this freebie :)


I started with a good sanding.  Not even joking...A GOOD SANDING!  I didn't want to ask what the black gloopy, hard thing was so I sanded the heck out of it!  And wouldn't you know it, because I'm working on multiple projects at the same time, I forgot to take pictures of the sanding and priming (as always, I prime with Zinsser Stain Blocking Primer).


 Oh well...on to the good stuff :)

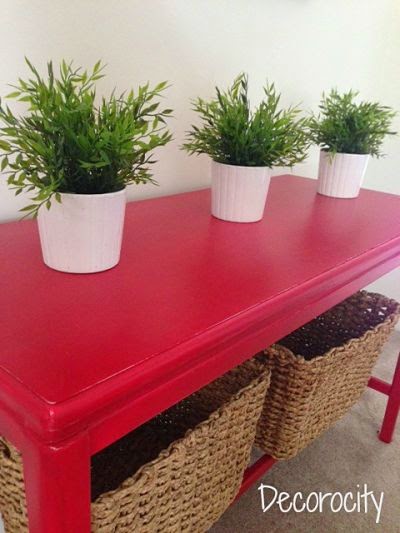
I knew that I wanted this console table to be a distressed red table.  The number of red paint colors is C.R.A.Z.Y!   It's quite overwhelming, so after looking at the upteen number of different red paint swatches and scouring the blogs, I came across this post showing different reds on different projects.  It helped me narrow my choices and went with Behr Ruby Ring.


 I knew going into this project I would need at least 3 coats.

1st coat

2nd coat

3rd coat

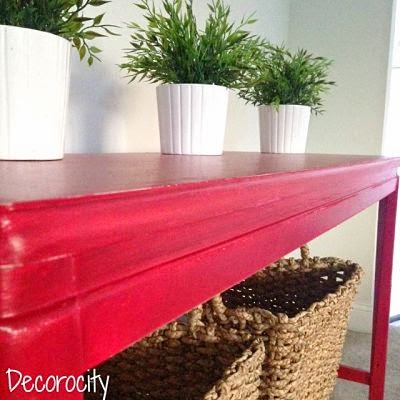
I really like the depth of the color of this red. I wanted a distressed look so I was going to add a glaze once I finished painting but I like the way it looks now.  It turned out exactly as I imagined.


I lightly sanded the areas the paint would normally have been worn down. 


I have been waiting for the right table to go underneath the art on the wall.  When the sun fills the room, the red looks bright.  But at night, the red looks close to the lighter red in the paintings.  I think eventually I will put a dark glaze on it to warm it up.


The thermostats in this house are in the wrong spots :(

Linked up:

Thrift Store find update

Happy Friday!  I am obsessing lately with gold and white, gold and blue, gold and black...ya know. Gold with anything!  Here is a little thrift store find I turned from mehh to yeah!


It's more than just a mug in my eyes :)


All it took to create this look was about 5 minutes and Rust-Oleum's Metallic spray paint!


I love finding creative ways to display flowers instead of a traditional vase.


Have a great weekend!!

Linked up:

Lamp love

Let me start by saying that I do not spend a lot of  money on furniture!  Having 3 boys and their friends' being boys as well...you can imagine the wear and tear on my furniture.  I have gone through 3 sets of couches.  Seriously 3 sets. The bigger my boys get, the heavier they get and the more force they use when they "plop down" on the couch!  (To be honest...my design taste changes so often that I look forward to having to replace them ;) )    The first set made it through the first years of our 3 babies.  I can't explain how much vomit soaked landed on them. I scrubbed them so much, the fabric looked like they had been sitting in the sun for years!  It's funny because it's where all three boys threw up.  Not the bathroom.  Not the floor.  Not a bucket. The couches. And on me, while sitting on the couch. On. The. Couch.  OK...too much information...sorry just keepin it real ;)

Speaking of the first set,  it came with a set of lamps, end tables and a cocktail table. The lamps are ceramic not wood.  I didn't like the color but loved the shape of them and since I'm loving a light and clean look, it's time to bring the love to my lamps!

Sorry for the bad quality of the pic :(

 I know they are not bad ugly but I'm just ready for a change.  And what better way for a change??  Yes, you know!  Rust-Oleum to the rescue and my love...the Comfort Grip :)

Now, I must say that I did clean the lamps with a cleaner and a rag.  They looked and felt clean and smooth.  Well... they weren't clean enough!  Paint doesn't love dust.  Say it with me!  Paint doesn't love dust!!  I should have cleaned with a toothbrush and used a lent free rag :(


You can see lent up close but I didn't see it when they were brown.
Thank goodness that I do not have friends that use a magnifying glass to inspect details... so I think I'm good for now.  But me knowing it's there is going to make me crazy!


They look so much better...even with the lent :)  

DIY Sunburst Mirror


I know I'm way late to the DIY Sunburst Mirror party, but hey better late than never. Right? Right.  I bought a sunburst mirror about 8 years ago when my local Bombay store was going out of business. I love the overall size of it and especially the size of the mirror. 


Recently, I've been looking to add one to my office, unfortunately they are a little pricey.  They range anywhere from $50-$200 and more. I'm not looking to spend near that much.  So when one is looking to do something cheaper than retail...what do we do?? We turn to blog land!  I found some awesome DIY Sunburst Mirrors!


Via Centsational Girl

Via The Frugal Homemaker

Via 9th and Mayne
I liked the color and style of the one from 9th and Mayne, so I bought the materials to replicate it.  As I'm laying out the floral rings and shims, I wasn't feeling the design and felt like I wanted something with more of a clean line.  So thinking about the way The Frugal Homemaker used a piece of scrap wood to secure the paint sticks and mirror, I decided to tweak her design and cut out a circle, in the plywood, the diameter of the shims and mirror.  I will explain as we go.

I bought a plastic framed mirror from the dollar store $1.79.  

I didn't sand, just primed.

For the record, when beginning a project, it may be helpful to sit down and make a list of supplies and actually have somewhat of a plan before diving in head first.  Of course, I didn't have a plan nor did I have what I needed to draw a circle of this size.  I laid out the mirror and shims to determine what the diameter should be.  At this point I haven't considered how I am going to draw the circle on the plywood.  So, I scrambled around my garage and decided to use leftover piping from my DIY project a few weeks ago as my protractor...not scientific and certainly not accurate! This is now a Shabby Chic DIY :)

Behold what I did!


After cutting out the circle, I glued down the mirror with Liquid Nails.  Then I laid the shims on the board with the thick part next to the mirror and I used a pencil to mark where I would need to cut off the excess at the thinner part.  This is where the accuracy of a perfect circle is important because I had to measure every shim and cut 37 of them individually.  Not the worst thing but I'm ready to get it done!  I lightly sanded the shims, eyeballed the placement and started gluing them using Liquid Nails. 


To stain, I used Minwax PolyShades in Espresso.


I didn't know if the stain would 'take' to the primed mirror frame, but that is what DIY is all about...the adventure!
1st Coat.  The stain on the mirror frame is looking good!
I applied 3 coats of stain, since I wanted a deeper look and the plywood was soaking it up.
All done and I love it!!   There are so many ways to DIY a sunburst mirror so not sure if anyone has done it like I did but I couldn't be happier with it :)  It looks so nice against my grey walls and the thrift store piece of furniture I restored (I will be posting it soon).


Linked up:

Basement Photo Collages

Although our basement is finished, it was in sad shape...as in just blah.  It was painted a light yellow and nothing on the walls.  Literally, NOTHING.  When you have 3 young boys who have a lot of young friends that like to throw things as well, you really just avoid the inevitable. Ya know :)  Now that my boys have gotten older, it's time to take back the basement!  Adult space!

We hung up the dart board and set up the folding poker table.  I will not be showing close ups of the poker table!  Many spills... and that's all I have to say about that (in my best Forest Gump voice).


These pictures are of Wildwood, NJ.  We vacation here every year.  The kids are never to old to hear "watch the train car please".  We love the games and rides, the sounds and food....oh the food.  There really isn't anything like it.  We get slices of pizza that are bigger than my two hands put together! The funnel cakes...the cheese steaks...the fried oreos...the saltwater taffy.  I have to stop!  It's really what these pictures represent.  Some of the best times of our lives were at the Jersey Shore!


I just used an online editor to make them black and white (it's a phase I'm going through) and then printed them on regular paper.  No need to have them printed anywhere but home.  FREE!!  I got all of the small black picture frames at the dollar store!

 Yes...we LOVE Elvis.


I haven't thrown darts in years. Years I tell you!  Hubs, who by the way is very good at darts, and I decided to play one night..well let me show you my first 3 throws:


I have to document this because it will NEVER. EVER. EVER. happen again!  I am at peace  :)

White Picture Frames Collage

I have so many pictures of the kids, vacations, family, celebrations...fun times.  Literally hundreds of hundreds of pictures!  OK, thousands upon thousands :)  Since I take at least three shots of every photo I take, thank the heavens for memory cards!  Those (goodness gracious I forgot what those things were called that we use to put in the camera...those rolls..film rolls!!)  film rolls in the camera use to be such a pain. For real!

I have wanted to do a collage with black and white prints with white frames for so long, but I didn't want to spend a fortune either.  IKEA is about an hour away and it just doesn't seem worth it to drive that far, for white picture frames...who am I kidding...I never leave IKEA without a fully loaded car. It. is. impossible. And is why I rarely go.  So what is the next best thing?  Thrift Store!  Check out my good luck!! All for $10.50! Hello 11 frames for $10.50 :)


When a girl wants a paint job done quick, I wouldn't know what to do without my Rust-Oleum!   :)

Via

They are about to be beautified!


Take a look.  They are so clean and fresh looking.  Btw... I went to JoAnn's for fabric and was looking around as always.  Then.  Lo and behold!  See through frames!   They were 50% off (they forgot to change the sign and shouldn't have still been on sale) AND I had a 20% off total purchase coupon!  Ka-Ching! Seriously, friends and family think I have a slight problem when I get a good deal because I have to make sure EVERYONE knows!  Notice the exclamation points...I'm still a little hyped up :)


I hung them on a wall in our basement.  We spend so much time down there and needed to fill up a very long wall.


I have the other side of the basement to show you in another post.  Til then....keep rockin!
Related Posts Plugin for WordPress, Blogger...